5 Simple Steps to Add a Home Screen Shortcut to Your Digital Planner (iOS)
This post may contain affiliate links. If you decide to purchase through my links, I may earn a small commission. Read my disclosure page for more info.
Who doesn’t love a good shortcut?
And especially when it comes to technology, we’re always looking for faster ways to get things done.
And if every time you need to jot things down in your digital planner, you have to unlock your iPad, find your annotation app, tap on it, search through all your files, then tap on your planner…that’s 3 steps too many, in my opinion. Agree? Thought so…
Luckily, there’s a faster way to get to your planner by cutting out the middle man.
Instead of having to open your PDF app and then your planner, why not just add a cute little icon for your digital planner on the home screen that’ll take you straight to it?
Today’s post is going to show you how to do just that.
In just 5 simple steps, we’ll create a home screen shortcut to your digital planner PLUS you’ll get some cute, and 100% free icon images to use!
So let’s do it…
IMPORTANT
Not all iOS apps support and integrate with Shortcuts in iOS. At the time of writing, Goodnotes is the only PDF annotation app that does.
I will update this post as more apps add this functionality, so check back later for your app!
5 Steps to Create a Home Screen Icon for Your Digital Planner (iPad)
1. Import the Digital Planner to Goodnotes
TIP
If your digital planner file is already in Goodnotes, skip this step and go to Step 2!
To create your Home Screen shortcut, the first thing you need to do is import your digital planner PDF to the Goodnotes app.
To do this, your planner file should already be stored somewhere on your device, either in iCloud Files, Google Drive, Dropbox, or another file management app. If it isn’t, I highly recommend saving it to your device to avoid any importing issues or glitches.
To import your planner, open Goodnotes and navigate to the main Documents screen.
Tap on the Plus (New…) option on the top left. Choose Import.
This pulls up a file browser window so you can locate and select your planner file. To get to your iCloud, Google Drive, Dropbox, etc. tap on the back arrow on the top left until you see a left-hand column of different storage locations.

If you don’t see the storage location you need, tap on the 3 Dots icon to Edit Sidebar. You may need to turn on your Google Drive or Dropbox via the on/off toggle.
Now, navigate to where your file is stored and tap on it. This will immediately import the file and display it within Goodnotes.
To learn how to import your digital planner or notebook to Goodnotes from other locations, check out…
2. Open the Digital Planner in Goodnotes
Go to Goodnotes and open your digital planner PDF file if you’re not already there.
This tells your iPad Shortcuts app we’re about to do something with this file and “registers” it in Shortcuts.
It’ll make our lives easier in a minute—trust me!
3. Go to Shortcuts App
Next, navigate back to your home screen but don’t completely close Goodnotes. Goodnotes should still be open in the background when you swipe up to display your Open Apps.
Now, Search your iPad apps by swiping from the middle of your screen towards the bottom. Type in Shortcuts and select the app when it appears.
You should see the main Shortcuts menu that looks something like this:

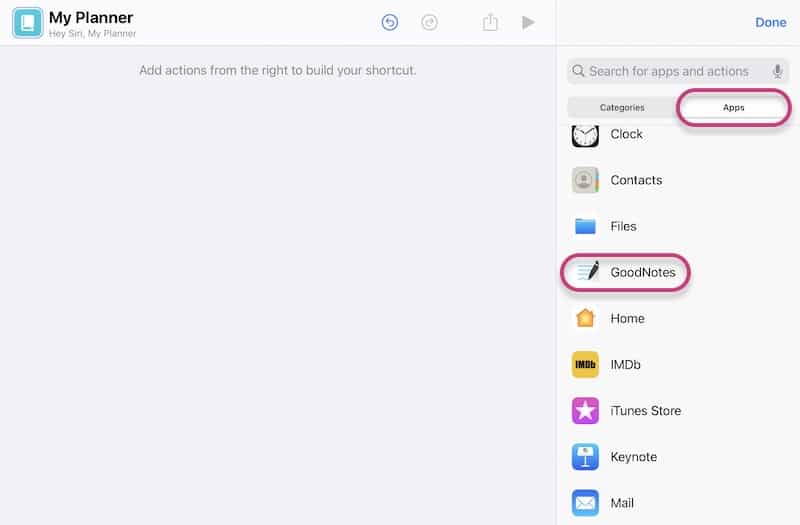
4. Creating Your Home Screen Shortcut
You have a few different options when it comes to your home screen icon. Your first option is to use a photo or image file of your own to become the shortcut icon. Or, Shortcuts also has built-in “generic” icons that you can customize the color of and the icon or glyph.
Depending on which method you choose, follow the steps below:
To Use a Custom Image or Icon
TIP
You’re welcome to use my FREE icons! Just scroll to the bottom of this post and save them to Photos 🙂
If you have an image or icon in mind that you’d like to use, make sure it’s saved in your iCloud Files or Photos app. It will need to be in an image file format (JPEG, PNG, etc.).


To Use a Generic Icon
Final Steps to Creating Your Digital Planner Shortcut
To finish things up, head back to the Shortcuts app and you should see the same screen where we left off. Tap Done.
You’ll be brought to the Shortcuts App main menu where you can view and edit your shortcuts. If you ever need to make changes to your shortcut, locate it on this menu and tap the Elipsis (…).
If you’d like to create another shortcut to a digital notebook or other planner, tap on the Plus + and follow these instructions again.
Conclusion
Now you’re digital planner looks just like an app on your home screen! Yay!
New to digital planning? Be sure to check out my ultimate guide which’ll walk you through everything you need to know to get started.
And if you like my icons, feel free to browse the Snazzy Pixels shop for some matching digital planners and notebooks. 🙂

FREE Shortcut Icons for Your Digital Planner or Notebook!
As promised, here are some FREE icons to use for your digital planner! Make sure to Tap and Hold and choose Add to Photos!
And don’t worry that they’re square! The Shortcuts app will add those rounded edges.
TIP
If the icon is distorted (glitch in some versions of iOS), save to iCloud Files and then use Choose File when uploading the icon image.


